Wednesday, June 1, 2016
Miniature Cloth Butterfly Dolls - The First Version of an Idea I want to Develop
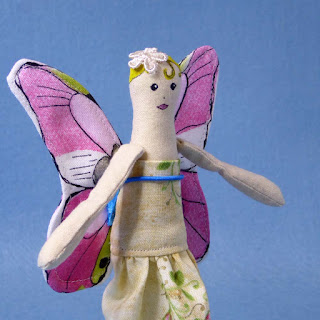
I wanted to create a design of a line of really small fabric dolls made in cotton with an aspect of the insect about them. This would combine my love for creating softies as well as bugs. Today I finished this first group of five designs - Butterfly dolls.
They are 14cm tall cotton fabric filled dolls wit removable dresses and wings and painted faces. They are a little bit Art Nouveau in style, a tiny bit Kewpie doll, a teensy bit fairy doll and are rather cute.
The biggest trade-offs were with size over articulation. I went as tiny as I could comfortably sew piees so that they could still be comfortably turned. I was able to make removable dresses and wings for each doll so it alows them to grow into part of a heirloom collection. I found wonderful wooden stands that worked a treat for the dolls as well.
The faces are created by a mixture of painting and then inked in details using fabric safe pens. In the designs of the features and the hair I tried to capture the detail of the wing fabric which is gorgeous. I tried wool hair first but I was not as happy with the result. The painted effect I think echoes the design much better.
I am inspired by this flexible design and want to create over options around other bugs. They photographed well and were fun to pose.
Wednesday, May 18, 2016
Felt Bug Sculpture Review after a month of being Crafty Bug Lady (and what I have used the bugs for so far)
Last month I created the Crafty Bug Lady business to explore insects, bugs and other mini-beasts using felt sculpture. After a month, I wanted to review the bugs I have created and how I have thought about using these creations.
Firstly to the rogues gallery. So far I have created three Brown Ants, an Australian Huntsman Spider, an Australian Redback Spider, a Honey Bee and a Monarch Butterfly.
The challenges I am working to overcome with each iteration include: the trade-off between ultra thin and yet strong enough limbs, the creation of satisfactory faces, antennae and eyes, the choice of embroidery stitch to use in each form, the type and thickness of felt, whether to include needle felting, and pushing the boundaries of size.
As each iteration is developed and because they are all so new, I have been using the finished items in a couple of ways. I have photographed the works as well as my humble skills allow, I have used these photographs in creation of fabric design on Spoonflower, and on finished item design on Redbubble. I have also listed finished sculptures for sale on Madeit. I am tracking the views each of the designs gets in each location as a way of getting feedback on the development. I will report the results once I have a bit of meaningful data to work with.
I am a bit apprehensive (and always have been) about using social media to promote myself. I feel like I am being pushy when create things and ask for feedback, but equally, the feedback is wonderful to guide development.
From my own point of view, my favourite item to date has been the Redback Spider, but the butterflies wings just look so nice up close.
Tuesday, May 10, 2016
Using Photoshop Elements to Create a Repeat Pattern for Spoonflower fabric (or any other purpose)
I have been busily creating soft felt sculptures of insects and I decided that the finished insects would be great subjects turned into a fabric design. This post is about my steps into turning my photos of the spider sculptures into continuous repeat pattern fabrics using Photoshop Elements 13, which is the simplified version of Photoshop but still really powerful. The same steps can be used to get you started in any photo manipulation.
I use the the "Expert" tab in the Photoshop Elements, not because I am expert but because you can do lots with it.
Start by opening the original photo you wish to use for the fabric in Photoshop.
Now I only want the spider rather than everything from this photo, so I want to collect the spider out of the background and put it into a new document sized just right for Spoonflower fabric. I will create this new document in a moment, but first I need to chop out the spider.
To select the spider from the background, I use the Magic Wand tool. Its in the left hand sidebar in the top group of 4 symbols and is a Magic Wand.
To use the magic wand use the '"Add" choice which is the second of the four choices in the bottom toolbar. Because the spider is very contrasted against the photo background, I selected a tolerance of about 100 (that's the slider in the bottom toolbar). Tolerance is just how much of the image is picked up by the magic wand. Don't worry if its too little or too much with your first choice because you can add and use by changing the "Add" or "Subtract" buttons and the tolerance bar up or down. Lower tolerance picks up less information or takes away less information. So using the add with a higher tolerance and then the subtract with a lower tolerance I got all the spider bits. I want to copy these into a new document. This is easy using "Ctl C" (thanks Windows shortcut).
I now need to create a new document as my fabric. Because Spoonflower likes to work in Fat Quarter size (which is the same as 1/4 of a yard of fabric) I am going to create a new canvas measuring 6300 pixels by 5400 pixels. I do this by choosing the "File" and "Blank Canvas" buttons in the top toolbar. I also set my resolution to 600 DPI (pixels per inch) because I like lots of detail. Spoonflower's minimum size is 150DPI, but there is also a maximum upload file size of 40MB so your final project needs to fall between these sizes.
6300 pixels * 5400 pixels @ 600DPI saved as a PNG file works well for me.
After the file is created I need to add a new layer. Layers are basically different "pieces of tracing paper" you stack up with each element of a picture on it. That way you can play with each element separately - moving, distorting, colouring, etc. For me I want each spider in my picture to be able to be manipulated separately so each spider is put on a different layer.
To open a new layer select "Layer" and then "New Layer". This gives me a spot to put all the bits of my spider I gathered up earlier. To get them on the layer simply press "Ctl V".
After putting the image on the canvas I can clean up the image by using the "Magic Eraser" option again from the left side bar and using the tolerance to choose more or less to rub out of the layer.
After cleaning up the image, I want to resize it for my canvas and that's where the "edit" and then "free transform" options let you change the spiders size, position on the page and shape.
You can play with this as much as you like and then select the green tick to confirm the moves made.
After I am happy with that spider I want to copy it a couple of times to get a repeat going. To do this I choose "Duplicate Layer" from the "Layer" drop down menu. I have copied it three times in the example below. Then in the right hand side tool bar you can see all the different layers. Just highlight which layer to play with and select file Free Transform to manipulate each.
I now have 3 spiders set out how I like them. I copy the spider once more (as a 4th layer) and then hide this new layer. This sounds scary but all you do is click on the "eye" beside the new extra layer and it gets a line through it to hide it. Making a copy is important because I am going the wrap the rest of the spiders around the page to allow a repeat to form and I will need a spare spider afterwards to put in the hole I make in the middle of the page.
After hiding the new spider layer copy and the bottom empty layer (which I can colour later), I select the "merge visible layers" option from the "Layer" drop down menu. Now all my spiders live on the same layer except my hidden spider.
I want these 3 spiders to be wrapped around the page so I select "Filter" then "Other" and then "Offset". For the fat quarter canvas I am using I need to cut the image in half both vertically and horizontally, so I put in an offset of 3150 pixels by 2700 pixels.
The spiders now look all mixed up. I make my spare spider layer visible again (by clicking the eye) and move this layer around using "free transform" to fill the hole between the other spiders.
I can play round with the positions, add a background colour to layer 1 and make a mock up test using the "fill layer" option (I will go through this another time). This final file I save as a PNG. When its uploaded to Spoonflower the spiders now look like this:
Its a nice way to get a continuous image. I am no expert but this does make my fabric designs look more professional.
Wednesday, April 20, 2016
Photographing your Craft with a Cheap DIY Lightbox
I have spent time over the last week putting together some new and improved ant sculptures. I was unhappy with the early versions face and so I improved the design to have more pieces that gave a more realistic finish. I was also unhappy with the felt I was using as it was all acrylic and did not look nice or feel like it would wear well over time. I moved to a wool blend felt which is more durable and has advantages of being able to take needle felting. This has allowed me a better shaping on body arts.
Now I have some finished ants that I am happy with, the next obvious stage is photographing the work. Photography is not something that comes to me naturally. I have only basic materials and I want the best result I can get. I have done a little research and come up with a reasonable and cheap DIY photography solution.
I have made myself a lightbox out of sheets of white corflute. These are available from my local hardware (Bunnings) at about $7 per sheet. I used 4 sheets - one for the floor that is separate and three to form a hinged backdrop. I say hinged but really its just clear packing tape along the seams. The only trick was getting a nice even length of tape attached to seams. You need a friend to hold the sheets at the correct position while you tape the seam. This three piece photography light box is light, portable and folds away for easy storage.
To the lightbox I have chosen to add lengths of felt as my backdrop. The felt works well with my art works plus has the benefit of being a great size to buy a continuous drop and is easy to keep flat (just roll it onto a fabric roll tube). I chose sky blue and have another in grass green.
The lighting for my rig is a combination of as much natural light as my best window will give plus a couple of desks lamps. I hope to improve these as time goes on.
I also found some wonderful cheap fake grass squares to use with my photos. They were a bargain at $2 each and 4 of them line up to make an interesting ground for my bugs eye view.
My camera is just a digital compact camera albeit a good one (a Panasonic Lumix TZ70). I invested in a second hand tripod from my local charity store for $30 (a great bargain) because with the compact camera you need stability to get clear close-ups on little items.
The end results are reasonable and I am continuing to learn all the time. There are so many wonderful blogs out there by professional photographers who provide hints on taking insect close-ups using compact cameras and the same rules kind of apply to an ant sculpture as to an actual ant except my models hold still!
Sunday, April 10, 2016
Making a Prototype
Today I wanted to get an idea of what I might be making so I decided to make a prototype of an ant in a small scale. Sometimes its nice to see the proportions of an idea and what you could do with it. That's where prototypes come in handy.
The little ant I made was using similar techniques as I used on my larger ant and mantis. It was nice to try out a few ideas and it helped me get an idea of both the look of an insect as well as point out issues. I am not super happy with the head but I really like the legs and body. The felt I used was not quite right, and I think playing with the colours to mix several. The strength of the skeleton I have constructed (I know its ironic in an insect) supports the weight well and allows lots of posing.
The prototype will be handy now for me to think about uses for the insects, how they will photograph, props needed, packaging, etc. So its a worthwhile exercise. But for now the prototype will leave me to research and sketching mode for idea development.
I am going in the near future to make a Phasmid (a leaf insect) so today I also took some photos of a lovely Phasmid we have been baby sitting for the school holidays. These photos will be super handy when I get to making this wonderful creature. They are endlessly fascinating.
Saturday, April 9, 2016
Naming My Business And Making It Official
Today I worked on making my new craft business an actual business. For tax purposes, that is. I know its boring, but I wanted to do the start up of my micro-business right and that means giving it an official name.
Here in Australia that means a couple of things. Firstly its a good idea to have an ABN (Australian Business Number). Now, I know that my business will be teeny tiny, but really any person who is creative and thinks that they may contribute to a publication, take part in an exhibition or competition, or teach their craft at the local library will need an ABN so that whomever they may get paid by can be right from their tax point of view.
ABN's are free to establish for sole traders (ie people carrying on business in their own name) and only take a couple of minutes to set up. This is done at the Australia Business Register. I ignored all the options like being a company because even though I may dream about having a team of people building giant insects for a display in Myers front windows the reality is it will be just e and won't be making te kind of cash that needs a 30c in the dollar tax rate. So sole trader it is.
I already have an ABN from having a previous business and also incidentally being part of exhibitions while studying ceramics at TAFE and entering competitions.
What I was lacking was registration of my business name. If you want to trade as just yourself (and you have an amazing name like Sweetpea Butterworth as your actual real name) then just the ABN is enough. But if you want to trade as anything other then your name you need to register that name. Its not free but its not really expensive, it only take a few minutes and it could stop you facing a nasty fine if you get caught trading without a registered name for your business.
So I registered myself as Crafty Bug Lady for a mere $34 in about 20 minutes. Go to the ASIC website to register rather than using one of those services that charge for this (honestly its easy).
The ASIC site makes you check that the business name is not used by anyone else. This can be helpful when you are coming up with a name for your business. I also used the traditional approach of Googling the possible names I came up with to see whom else is using it and what images come up when you use Google Image. I also checked online craft sellers like Etsy and Madeit to see if anyone else is using the same name. I was originally going to call myself Crazy Bug Lady but after a check I found someone already using this as a blog title (her blog looks really good by the way and I will go there to learn much about insects).
After I was happy with a name I made sure I set up a blog in the name (your looking at it), an email address and I will have to go and set up some online sales sites sometime soon (once I have chosen which to use).
I chose "Crafty" over crazy in the name because it ties in with the crafting business plus I think it sounds like someone who can come up with cunning solutions to situations.
I chose "Bug" because lots of people use this word to capture all things insecty, crawly, alien and just a bit weird. Bug makes sense.
And the "Lady" is obvious. Otherwise I might have gone as "Bloke" instead!
Friday, April 8, 2016
Starting Out - Setting up a new Craft Micro-Business
Yesterday I decided to start my craft micro-business, Crafty Bug Lady. And because I can, I thought I would write down my process. Blogging is a great way to write what ever the heck is on your mind and because it is immediate, and modular and accessible it seems the right way to capture the words about starting this micro-business and if I capture all the processes from the very start it may be a good learning exercise for me and possibly other people as well. The blog will evolve over time but just now this is the start...
So why did I start Crafty Bug Lady yesterday? The short answer was it seemed the right moment.
The long answer is a bit more complicated. On Wednesday afternoon I got an email from one of my editors to say she had been made redundant after eight years and that she was unsure of what the future is for the craft magazine she was editor for. For me as a craft pattern designer and writer this was not an unexpected event. I kind of knew it was a matter of time. The print media in Australia and indeed the world is hemorrhaging sales and as a result talent, content, diversity is all suffering. Having this particular craft magazine disappearing does not mean I cannot create more craft articles, but this event has been a catalyst for me creatively.
Although I started this craft micro-business yesterday, I am not coming to micro-business without any history. Apart from writing craft patterns for craft magazines (I have had around 100 articles published since around 2011) I have had a micro-business called Sharlzndollz. This crafty business had an Etsy and a Madeit shop for quite a number of years selling finished products firstly based on appliqued cute soft toys and bags, then jointed paper dolls, then wallets with a funky twist (science fiction pattern fabrics, fantasy pattern fabrics, and other weird fabrics). I also have developed fabric designs on Spoonflower and print designs on Redbubble. I even published a book of paper dolls on Lulu. All of this experience has been wonderful but I felt that I had lost my vision and direction in this craft business. The thing that I was missing in Sharlzndollz was a focus of what I wanted to create. I had let a lot of the business slowly drop off as I got sick of some things I was doing like process-work type making of wallets. I was hating many of the parts of creating that should be fun, and I was drifting along and not committing to creative development.
But yesterday a lot of thing come together and it seemed right to start Crafty Bug Lady.
There is lots of information out there about parts of starting up a business but the big part of a business is ultimately a good idea. My idea at this point is to create around my passions of insects, amphibians, fossils, succulents and ferns. The type of creating is a bit fluid right now (well its early days) but I have really enjoyed two projects I have made this year: a praying Mantis and an ant.
This is me with my two creations.
I have made this items using very basic materials and techniques. They came together a treat and I have felt better about the finished project more than anything else I have made in a while.
So yesterday I started Crafty Bug Lady around the concept of these insects. I am not sure about what the journey will be and I will post (irregularly knowing me) about the process. I will start by talking about what I did first - the idea, the name, the technology around the name and what I will make. I will talk about more details of my experiences, about working through processes of setting up the micro-business as the pop up and about where to get help.
But not today, because I figure I've done enough with just starting (yay) and than saying why I've started the business.
Subscribe to:
Posts (Atom)